
For the past month, I have been using Picnik to edit my pictures as the upgrade to my photoshop software hasn't quite made its way into my hands. And while it doesn't have all the flexibility of photoshop, it really is a powerful and wonderful tool when used correctly.
A lot of people have written and asked about how I process my images, so I decided to create a simple tutorial for those of you that are looking to get the soft, dreamy and slightly pink look (the signature pearlie pink style) to your photos. After you do it once and see how simple it is, you'll want to do it to all your photos... and might just have to check yourself into picniker's rehab.
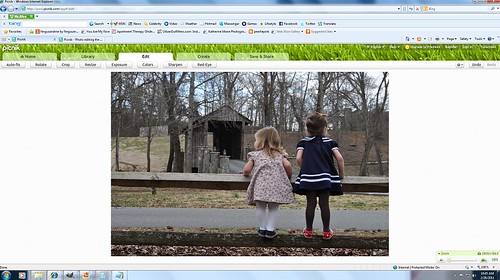
1. open up picnik.com in your web browser
2. under the home tab, click "Upload" and choose one of your most favorite images for editing.
3. once your upload is complete, your picture will pop up under the edit tab. This is where you will start to work your magic.
A lot of people have written and asked about how I process my images, so I decided to create a simple tutorial for those of you that are looking to get the soft, dreamy and slightly pink look (the signature pearlie pink style) to your photos. After you do it once and see how simple it is, you'll want to do it to all your photos... and might just have to check yourself into picniker's rehab.
1. open up picnik.com in your web browser
2. under the home tab, click "Upload" and choose one of your most favorite images for editing.
3. once your upload is complete, your picture will pop up under the edit tab. This is where you will start to work your magic.
4. under the edit tab, click on the "exposure" option
5. bump your exposure up accordingly. i bumped mine up to 38 because i like my photos really soft, but bump yours up to your preference
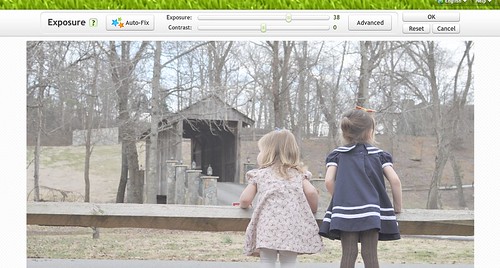
6. hit the "okay" button
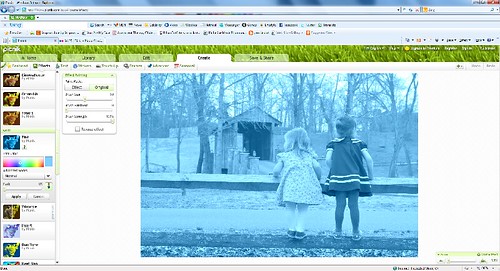
7. you're nearly half way there... now click on the create tab on the top navigation bar

8. you will see a toolbar that has several options (featured, effects, tects, stickers, etc.). Click on the effects tab
9. scroll down to the "tint" option and click on it. clicking this option will turn your entire image completely blue! no worries, we are still on the right track
10. for the tint color choose the pinkish-red tint on the far left, bottom corner
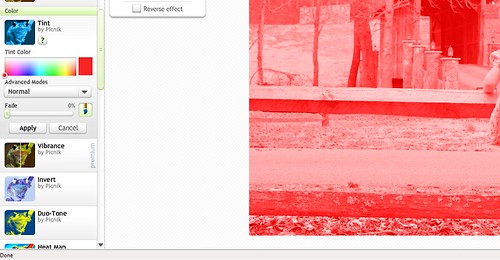
11. this will change your tint from vibrant blues to reds and pinks- but the effect will still be too strong.
12. use the fade option under the "tint" effect to soften the reds and pinks. i've set my fade to 80 percent
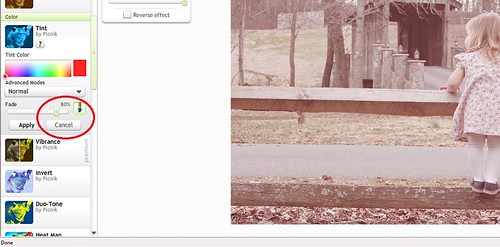
13. click the "apply" button
14. you are now left with a beautiful and soft, timeless image
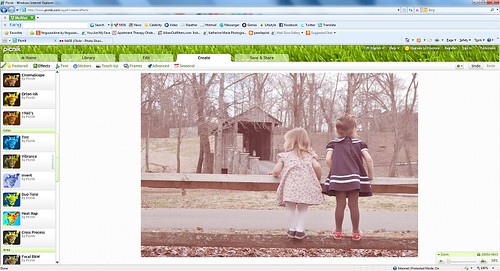
15. click on the save & share option in the top navigation bar and explore your options from there. you can save to your computer, to facebook, to flickr, and numerous other places.
You went from this:
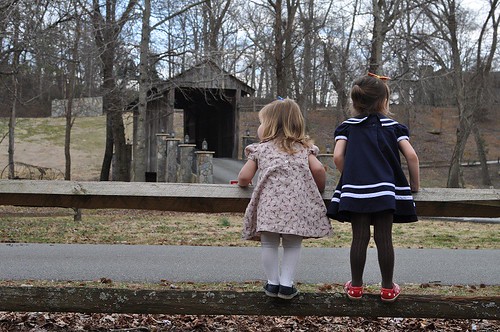
to this:

Pretty magical, huh? And it didn't even cost you a dime...
The best things in life are free, indeed!
Happy Picnikin'!
=========================
If you've enjoyed this tutorial and found it useful, please let me know and pass it along to others. I may offer a few more picnik tutorials in the future if there is enough interest. Also... if you give this a try, please share your results with me by providing a link or tagging me on facebook. I would love to see your lovely new pearlie pink images! :)
I love picnik too, I'm glad I'm not the only one! :) Your pictures are always so beautiful. I was wondering how you edited them :) My original (but still a little edited) photo is on my blog, but this is edited using your tutorial :) http://www.flickr.com/photos/thecupcakerygirl/5485840449/ Thanks for the tip! How fun!
ReplyDeletePhoto editing is mostly a mystery to me, and there's no hope that I will ever learn to use photoshop (not that I have it anyway) so this little tutorial is perfect! Keep 'em coming please! Here are my results: http://elsteinmann.blogspot.com/2011/02/kim-at-pearlie-pink-posted-little.html
ReplyDeleteI use Picnik exclusively. No Photoshop for me!
ReplyDeleteFantastic post, Kim! I have Photoshop but sometimes the features can be a nit overwhelming, especially for a novice. I'm totally going to check this out!
ReplyDeleteI use Picnik all the time! I'll have to try this out.. this is what a lot of my Instagram photos end up looking like on my iPhone, but I definitely will try it on my regular pictures, too.
ReplyDeleteVery helpful! Keep it up! <3
I tried it out on my newest post! Thanks for the tutorial! I have been using picnik a lot lately, it's so much easier (and quicker!) than photoshop!
ReplyDeletehttp://dandelionsandlace.blogspot.com/2011/02/cupcake-cookies.html
So beautiful. Thanks for sharing this tip.
ReplyDeleteI am so glad yall have enjoyed this post! I have enjoyed seeing all your *pearliepink* images via facebook, your blogs and flickr! I'll have to make another picnik tutorial soon! :)
ReplyDeleteoh great! thanks so much!(:
ReplyDeleteThanks you so much! I was just going to ask about your lovely photography. I'm gonna try this immediately.
ReplyDeleteI am new to picnik, and I find myself too "scared" to try new ways of playing around with my photos...SO, your picnik tutorials will help me out loads! THANKS for the inspiration! :)
ReplyDelete